
January 3, 2023
Plate and menu costing is a traditionally time-consuming process. The basics are something every chef, or chef/owner, or chef/owner/general manager if you’re really wearing all the hats should know. If you’re just getting started and didn’t go the culinary school route, how do you know where to begin? This blog covers the step-by-step basics (we’re talking Restaurant 101) of how to calculate plate and menu costs and a game-changing, time-saving hack that makes the whole process a breeze.
First things first - let’s talk about this hack we keep mentioning because no one wants to have to scroll all the way through this blog to find out what it is. Ok, you ready? The hack is to use a restaurant management system (RMS) to manage recipes and plate costs for you. Now that our secret’s out, we’ll still go through the basics and at the end of each section explain how using an RMS makes each step a million (roughly) times easier.
![[Download Now]: Recipe Costing Calculator](https://no-cache.hubspot.com/cta/default/6423873/2e80412b-ff7f-426c-ab1f-bcb566f085c8.png)
Here are 4 steps to costing out menu items:
1. Write out recipes with yield amounts
2. Collect ingredient prices
3. Calculate ingredient costs
4. Determine menu price
Step 1
Write out recipes with yield amounts
This step is all about quantifying how much of each product you’ll use in your final plate. There are a few different methods you can take here, and finding the right one will depend on your goals.
If you’re looking for a general idea of what your plate margins should be, you can choose to omit lower-cost or low-volume products in the recipe like salt, seasonings and fats like vegetable oil or butter. This will save you time as they most likely add a negligible amount to the final plate cost. If it’s for a Hollandaise sauce, we don’t recommend skipping the butter (assuming your Hollandaise is delicious).
If your goal is to get super into the nitty gritty, you should cost out everything that goes into your recipe. We don’t recommend this unless you have a catering operation or recipes with very large batch yield amounts like salt and sugar for curing your own bacon.
With a large menu, we recommend starting with your prepped items like sauces, dressings and sides – think of batched products you use on multiple plates. If you start with these items, when you get to the point of costing out a full plate with sides, etc. included, it's a simple addition and you won’t need to re-cost them each time.
How using an RMS helps with this step: if your RMS is collecting your product information via invoice processing, all of your products will be searchable when you input your recipes. You’ll still have to enter recipes into your RMS, so it’s not a huge time savings, but it will be slightly more efficient.
The biggest advantage of an RMS at this stage is digitizing your recipes, making them much easier to track and update in the future.
Step 2
Collect ingredient prices from your most recent invoices
This step is a beast, we won’t lie to you. To start, you’ll want to find your most recent invoices for up-to-date product pricing and a sustainable source of caffeine.
Next, you’ll want to create a spreadsheet with all your recipe ingredients and put their most recent price and purchased quantity in the next two columns. Then we recommend converting the quantity into a weight-based measurement (if it’s not already), such as an “each” to “60g”. Ultimately what matters is staying consistent in your measurements for your product price and your recipe amount.
If math isn’t your thing, we’ve got a free downloadable plate cost calculator.
With an RMS that processes and digitizes your invoice data, this step is pretty much eliminated. When you send in your invoices, their prices and quantities are updated automatically each time, meaning recipe costs are always up to date and there’s no need to continually update your spreadsheet! Because they’re already stored in the platform, those numbers will already be there when you select a product to add to a recipe. You may still need to convert units to match your recipe measurements if you’re going from volume to weight (i.e. a cup to an ounce), or from an “each” to another measurement (i.e. a case to pounds).
The right RMS will save those conversions for you, so if you ever use the product again in another recipe, it will prompt you with your previous conversion. Another step saved! At this rate, you’ll have so much free time using an RMS you can actually go on that Yucatan vacation you promised your partner three years ago. Let’s face it – you both deserve it (and won’t it be nice to not have unfulfilled promises hanging over your head anymore?).
Step 3
Calculate the cost of each ingredient by amount
Once you have your products, amounts and product prices, it’s a simple math problem to figure out how much each ingredient costs in your recipe.
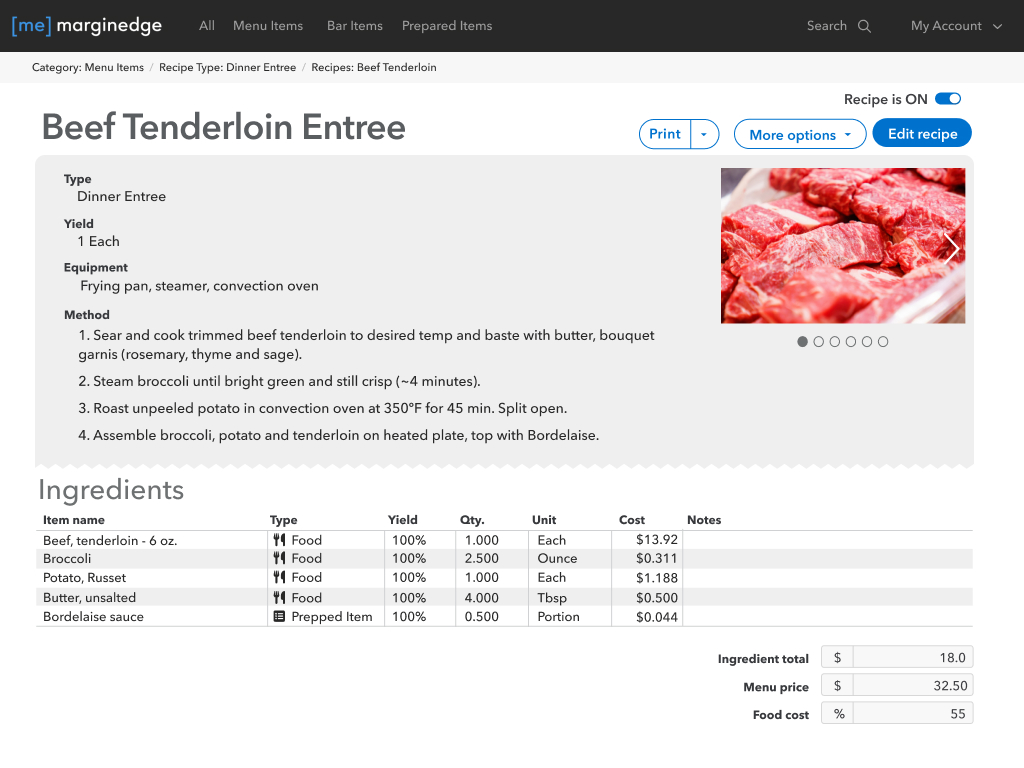
For example, let’s say your entree has a 6 ounce beef tenderloin steak. First, you’ll take the purchased price and divide it by the purchased quantity. So, you purchased 6.25 pounds of beef tenderloin for $232.06. 6.25 pounds is 100 ounces, so your equation will be $232.06/100 giving you $2.32 per ounce. Now multiply that by the 6 ounces in the recipe and you get $13.92. This is how much the beef tenderloin will contribute to your plate cost.
Continue the exercise for all your remaining ingredients and add their totals together.
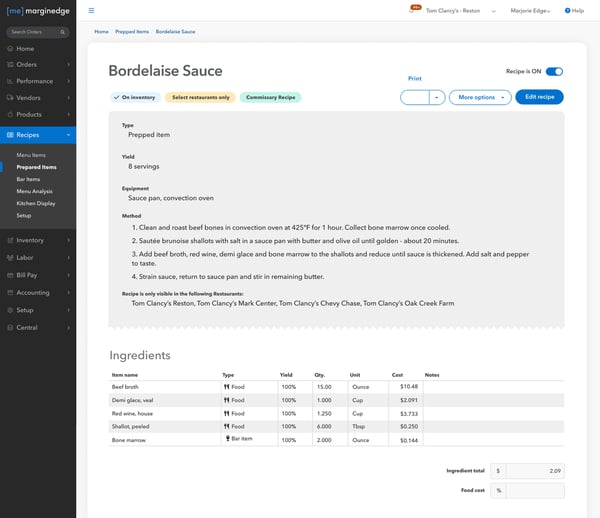
If you separated the prepped items and found their costs, you can treat them as whole products for this equation and use a serving as a measurement where weight or volume doesn’t make sense. For example, your Bordelaise sauce makes 8 servings per batch, and the cost of the ingredients to make one batch comes out to $16.69. So, one serving of the Bordelaise sauce will be $2.09 (16.69/8).
With an RMS, there’s no need for math (other than any special conversions) as the software will automatically calculate the price per ingredient for you, and add them together. This step happens automatically as soon as you input ingredient amounts in Step 1 and hit save.
How many hours did that just save you? Maybe enough hours to finally put together the treehouse you promised your kids last spring? Just a thought.
Step 4
Determine the menu cost
This step is more open to interpretation and gut instinct than its three predecessors. The industry standard (aka what they teach in culinary school) is food costs should be 30%. Where did this number come from? Only the chefs of lore know for sure, but we recommend just treating it as a jumping off point.
Let’s first start by really breaking down what “percent food costs” means. Feel free to skip this part if you already know. When chefs talk about something being X percent food costs, it means how much of the menu price is pure ingredient cost. So if a plate is 30% food costs, it means the raw ingredient prices make up 30% of the plate cost, which in turn gives you a 70% markup.
Now, when we say markup, we do not mean 70% profit. There are a number of overhead costs included in plate cost like labor (which together with food costs make up Prime Costs!), rent, utilities, POS/accounting costs, etc. So while a 70% markup sounds really nice, the actual profit from that item is going to be very different and is not something a plate cost calculator can give you.
If your RMS incorporates or integrates with your labor platform, then you can view up-to-date Prime Costs and overall costs of goods sold (COGS) to have a better view of overall profitability. In all honesty, a cloud-based RMS is the best way to see true profitability in real-time, from anywhere – but that’s a blog for another time.
Now back to that 30% – this number won’t always be possible for every plate.
Take our beef tenderloin entree, for example. The total cost of ingredients for one plate is $18. 30% food costs prices that entree at $60. If you’re the kind of joint that can charge $60 for a steak entree, then mazel tov. However, if $60 is out of your diners’ budgets, you may need to go for a lower price and find another place to make up for it.
This can be done with lower food cost items, like plates of pasta, etc. It’s all about balance – and beer, wine and liquor sales (which typically have much lower food costs) will also help offset higher cost items. Check out this blog for more ideas on how to optimize your menu profitability.
There are two ways to figure out plate costs, either by target percentage (so dividing total ingredient cost by target cost percentage) or by a target menu price to determine food cost percentage (dividing total ingredient cost by target menu price).
If you use an RMS, you can plug and play with the numbers to find your targets very easily and view all your food costs at once with dashboards and reporting.
Using an RMS lets you estimate food costs quickly. Because recipes are digitized and product prices are updated for you, you can make adjustments and see how that impacts prices in real-time.
Being able to quickly change ingredient amounts comes in handy for catering and figuring out bulk or batch pricing while still meeting profitability targets. Or maybe you have a quarterly special that rotates out seasonal vegetables but the protein stays the same? With an RMS you can duplicate your original recipe, swap in a new vegetable with the product price automatically populated, and know what your menu price needs to be to stay profitable in less than five minutes.
Once upon a time, restaurants could get away with updating menu prices once or maybe twice a year (if ever!). With the current economic climate, inflation and everything else in between, operators cannot afford to wait before making sure their menus are profitable. Doing it by hand takes a lot of time, effort and upkeep. Anytime you have manual data entry there’s a potential for mistakes to be made, and janky back-office computers have been known to crash right when you really don’t need them to.
A digitized, automatically-updated and cloud-based RMS takes all spreadsheet maintenance off of your plate and puts the return on investment right back in your pocket.
